DOES ORIGINALITY IN RECIPES EXIST?
Today, I read an article regarding a Food Network chef's show not being renewed because her recipes are derivations of other chef's recipes. So I wanted to share my views on whether recipes are ever actually original. I think the answer is no. Every recipe, every recipe, every recipe is based on some other recipe in some shape or form. To claim yours is really original is just plain arrogance. And unfounded arrogance at that!
I want you to know this because every single recipe of mine that I have made for you over the years is based on another. Either a recipe of my mother's, and heaven only knows where she got them from, or a recipe from a book or a magazine, or just an attempt to copy a dish I enjoyed at a restaurant.I have never made a recipe exactly as it was given to me. But why would I want to? My tastes and those of my family are different than yours. I cook to my tastes, period. You do the same. That's the way cooking goes. Don't give it more importance than it needs.
Cooking is an art form. A very sensual, very personal art form. If you choose to fret too much about exactly copying someone else's techniques, you lose the pleasure in that. Just enjoy the process and savor the end result. If you see a recipe here you like but want to substitute something. Then go for it. It's your meal, your dish, your taste buds. Own it.
Enjoy,
Keyla
Thursday, February 16, 2012
Wednesday, February 15, 2012
FLAN DE LECHE AL ESTILO LILA'S
 This is probably my favorite Cuban dessert of all time. A real indulgence because of all the sugar and fat in this dish. I don't make it in the traditional Nitza Villapol style of my mother. This was my mother's recipe at one time. I suspect that she took it from Nitza Villapol's book, La Cocina Criolla, but I have been told it's always been made this way in our family. No matter, though, the ingredients are so simple that it may just be made the same way all over the island...from my mother's Oriente to my father's La Habana, it's unlikely that the recipe changes much.
My style is a variation based on Lila's, that great Miami Cuban restaurant renown for its steak with papas fritas and its flan.
Lila's was in business for over 30 years in Miami, until they were forced out of their lease in order to put in another Home Depot. The owner, now an elderly man, apparently decided to thrown in the towel rather than rebuild. Damned shame, too.
I remember going there as kid, with my parents and my grandparents on Sunday evenings for a meal. A tradition my family continued after my own sons were born. Those were great days! My dad would always start our meals with their mariquitas with mojo - a type of fried banana chip with this tangy sauce on top. Then we'd all move on to the steak. We'd all have the same thing - no variation - just the steak, the size of a small serving platter, cooked in onions and piled high with fresh cut french fries. No ordinary amount of fries. These fries formed a 6 or 7 inch high dome over the entirety of the steak. So good. Just the memory overwhelms.
But, dinner wasn't over because dessert was coming. And we all knew what that meant. FLAN!! And not just any flan...LILA'S FLAN! This flan was creamier and silkier than the one my mother traditionally made. The velvety texture coated your mouth and went down as smooth as drinking whipped cream. While all the bitter sweetness of the burnt sugar candy sauce provided just enough bite to be interesting. How I loved that flan!
Well, this is my attempt to mimic that flan. I changed my mother's recipe by removing some eggs and replacing them with extra egg yolks. I hope you guys like it. Just remember to be careful of your audience when you serve this. Many people find Cuban flan to be too sweet. It is definitely way sweeter than the Mexican or Argentinian varieties I have tried. But, hey, Cuban's national product has always been sugar, so what do you expect?
The Ingredients...
 2 whole eggs (My mother's recipe calls for 4 eggs and no egg yolks. But I changed this trying to get a creamier consistency more like Lila's)
4 egg yolks
1/3 cup of sugar for flan
1/2 cup plus 1 tablespoon of sugar for caramel
1 can of condensed milk
1/2 cup of evaporated milk
1/2 cup of heavy cream
1 1/2 teaspoons of vanilla
1/4 teaspoon of salt
OPTIONAL FOR VARIATION: 4 ounces of cream cheese
The Equipment...
A whisk. But if you decide to use the variation using the cream cheese, you will need a hand mixer.
A large bowl
A small sauce pan
A large pan that can go in the oven, like a lasagna pan or a rectangular baker
A smaller round pan that can fit inside the large pan
Cook the Caramel...
You need to start the caramel before the rest of the ingredients because you are going to let it cool a bit in the bottom of the pan. If you don't let it cool a bit and just pour the custard mixture on top of it while it is still hot, you will end up ruining some of the custard mixture.
A WORD OF WARNING ABOUT THIS STEP...this stuff is liquid fire!! Even worse it is horribly sticky liquid fire. Once it gets on your skin, you are toast and an emergency room visit is your next step. So be very careful on this step!
 1. Place the round pan you will make the flan in right next to the stove. Once the caramel is ready you do no want to walk with it across the kitchen. Like I said this thing is hot, hot, hot and burns pretty bad. Limit the walking you do with it!
2. Place 1/2 cup plus 1 tablespoon of sugar in a small sauce pan and place over medium to medium high heat. On my stove the right temperature is somewhere between those two points on the dial. You can add a little bit of water, about 1 tablespoon, if you'd like. I will be honest and say I have made it both ways, with and without water and do not see any difference. But my mother always adds the water. I usually don't.
 3. Whisk this continuously until the sugar starts to turn brown and is clear. This process is very tricky because it will look like nothing is happening for so long, then suddenly it starts to bubble and is brown and clear. When this happens immediately pour it into the round pan and swirl the round pan so it covers all of the bottom. DO NOT TOUCH THE BROWN LIQUID SUGAR!
 4. Now set this aside to cool a bit while you prepare the custard. Oh, and at this point, go ahead and turn the oven on 350 degrees to pre-heat because the custard will not take you long to prepare.
Prepare the custard...
1. Put all of the eggs and the egg yolks in the bottom of the bowl. Use the same one egg at a time procedure from my prior posts.
2. Add the 1/3 cup of sugar to the bowl and whisk this all together. (If you are making the cream cheese version, add the cream cheese to the sugar first and beat them together as if you were beating butter and sugar, then add the eggs.)
3. Whisk in the can of condensed milk, the 1/2 cup of evaporated milk and the 1/2 cup of heavy cream.
4. Whisk in the 1 1/2 teaspoons of vanilla and the 1/4 teaspoon of salt.
5. Pour the mixture into the bottom of the pan with the caramel in it.
Bake the custard...
 1. Put the pan with your custard inside the bigger pan and put the pan in the oven
2. Pour water inside the bigger pan about 1/2 way up the side of the small pan. This is called a water bath. It is as if your little pan is taking a bath inside the bigger pan. Don't get water in your custard. You do not have to cover the little pan, unless you have added the cream cheese. If you added the cream cheese, then you must cover the pan with tin foil as if you were making a cheesecake.
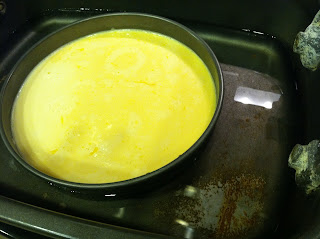
3. Now bake this in the oven for 60 minutes. After 60 minutes, turn off the oven but let your flan sit in the oven for another 15 minutes.
4. Be very careful when you take the flan out of the oven because the water from the water bath is very hot and will burn you if it sloshes on you.
5. Put your flan in the refrigerator for at least 4 hours before you eat it. It will not taste good or be creamy just out of the oven. It must get cold!

My style is a variation based on Lila's, that great Miami Cuban restaurant renown for its steak with papas fritas and its flan.
Lila's was in business for over 30 years in Miami, until they were forced out of their lease in order to put in another Home Depot. The owner, now an elderly man, apparently decided to thrown in the towel rather than rebuild. Damned shame, too.
I remember going there as kid, with my parents and my grandparents on Sunday evenings for a meal. A tradition my family continued after my own sons were born. Those were great days! My dad would always start our meals with their mariquitas with mojo - a type of fried banana chip with this tangy sauce on top. Then we'd all move on to the steak. We'd all have the same thing - no variation - just the steak, the size of a small serving platter, cooked in onions and piled high with fresh cut french fries. No ordinary amount of fries. These fries formed a 6 or 7 inch high dome over the entirety of the steak. So good. Just the memory overwhelms.
But, dinner wasn't over because dessert was coming. And we all knew what that meant. FLAN!! And not just any flan...LILA'S FLAN! This flan was creamier and silkier than the one my mother traditionally made. The velvety texture coated your mouth and went down as smooth as drinking whipped cream. While all the bitter sweetness of the burnt sugar candy sauce provided just enough bite to be interesting. How I loved that flan!
Well, this is my attempt to mimic that flan. I changed my mother's recipe by removing some eggs and replacing them with extra egg yolks. I hope you guys like it. Just remember to be careful of your audience when you serve this. Many people find Cuban flan to be too sweet. It is definitely way sweeter than the Mexican or Argentinian varieties I have tried. But, hey, Cuban's national product has always been sugar, so what do you expect?
The Ingredients...
 2 whole eggs (My mother's recipe calls for 4 eggs and no egg yolks. But I changed this trying to get a creamier consistency more like Lila's)
4 egg yolks
1/3 cup of sugar for flan
1/2 cup plus 1 tablespoon of sugar for caramel
1 can of condensed milk
1/2 cup of evaporated milk
1/2 cup of heavy cream
1 1/2 teaspoons of vanilla
1/4 teaspoon of salt
OPTIONAL FOR VARIATION: 4 ounces of cream cheese
The Equipment...
A whisk. But if you decide to use the variation using the cream cheese, you will need a hand mixer.
A large bowl
A small sauce pan
A large pan that can go in the oven, like a lasagna pan or a rectangular baker
A smaller round pan that can fit inside the large pan
Cook the Caramel...
You need to start the caramel before the rest of the ingredients because you are going to let it cool a bit in the bottom of the pan. If you don't let it cool a bit and just pour the custard mixture on top of it while it is still hot, you will end up ruining some of the custard mixture.
A WORD OF WARNING ABOUT THIS STEP...this stuff is liquid fire!! Even worse it is horribly sticky liquid fire. Once it gets on your skin, you are toast and an emergency room visit is your next step. So be very careful on this step!
 1. Place the round pan you will make the flan in right next to the stove. Once the caramel is ready you do no want to walk with it across the kitchen. Like I said this thing is hot, hot, hot and burns pretty bad. Limit the walking you do with it!
2. Place 1/2 cup plus 1 tablespoon of sugar in a small sauce pan and place over medium to medium high heat. On my stove the right temperature is somewhere between those two points on the dial. You can add a little bit of water, about 1 tablespoon, if you'd like. I will be honest and say I have made it both ways, with and without water and do not see any difference. But my mother always adds the water. I usually don't.
 3. Whisk this continuously until the sugar starts to turn brown and is clear. This process is very tricky because it will look like nothing is happening for so long, then suddenly it starts to bubble and is brown and clear. When this happens immediately pour it into the round pan and swirl the round pan so it covers all of the bottom. DO NOT TOUCH THE BROWN LIQUID SUGAR!
 4. Now set this aside to cool a bit while you prepare the custard. Oh, and at this point, go ahead and turn the oven on 350 degrees to pre-heat because the custard will not take you long to prepare.
Prepare the custard...
1. Put all of the eggs and the egg yolks in the bottom of the bowl. Use the same one egg at a time procedure from my prior posts.
2. Add the 1/3 cup of sugar to the bowl and whisk this all together. (If you are making the cream cheese version, add the cream cheese to the sugar first and beat them together as if you were beating butter and sugar, then add the eggs.)
3. Whisk in the can of condensed milk, the 1/2 cup of evaporated milk and the 1/2 cup of heavy cream.
4. Whisk in the 1 1/2 teaspoons of vanilla and the 1/4 teaspoon of salt.
5. Pour the mixture into the bottom of the pan with the caramel in it.
Bake the custard...
 1. Put the pan with your custard inside the bigger pan and put the pan in the oven
2. Pour water inside the bigger pan about 1/2 way up the side of the small pan. This is called a water bath. It is as if your little pan is taking a bath inside the bigger pan. Don't get water in your custard. You do not have to cover the little pan, unless you have added the cream cheese. If you added the cream cheese, then you must cover the pan with tin foil as if you were making a cheesecake.
3. Now bake this in the oven for 60 minutes. After 60 minutes, turn off the oven but let your flan sit in the oven for another 15 minutes.
4. Be very careful when you take the flan out of the oven because the water from the water bath is very hot and will burn you if it sloshes on you.
5. Put your flan in the refrigerator for at least 4 hours before you eat it. It will not taste good or be creamy just out of the oven. It must get cold!
Tuesday, February 14, 2012
PICADILLO Y ARROZ BLANCO (A CUBAN DISH)
This is a dish popular in almost every Cuban household and is a variation of my mother's own picadillo recipe. But it has numerous changes from my mother's original to the ingredients and the techniques.
Picadillo is basically Cuban peasant food. Every grandmother has her own recipe that she passes down to her children and no two grandmothers make it the exact same way. I like how adaptable it is to the particular tastes of each cook. It's popularity is based on how inexpensive the dish is to prepare. But it is the common simplicity of the dish that evokes that warm feeling of childhood and home.
The best part is you can make this the day before and just reheat for dinner because it is actually better the next day when the flavors truly meld. Also this is the best filling ever for the empanada. Ever. Your empanada will evocakie memories of the Jamaican patty when filled with picadillo.
The recipe below will easily feed 4 to 6 people and leave you enough to make empanadas to take for lunch the next day.
The ingredients...

2 lbs. of ground beef
4 to 5 good sized potatoes
1/2 cup of olives (Buy the pitted spanish olives that have the red pimiento inside.)
1/4 cup of currants or raisins
1 cup wine (I like red, but white is fine.)
1 green bell pepper
1 onion or 2 shallots
4 garlic cloves
3 ounces of tomato paste
1 can of crushed tomatoes
olive oil (I prefer the mild kind for this cooking.)
2 jalapeno peppers or 1 habanero (This is optional and not at all traditional. I prefer the Habanero.)
Sazon (Find this in the latin section of the grocery store but you can also use Sazon Completa,)
salt
pepper
garlic granulated powder
2 cups white rice
The equipment...
Rice cooker (these usualy have their own measuring cup)
Large pan
Cutting board
Knife
Large cooking spoon
Measuring spoons
The preparation...
 1. Peel and cut the potatoes into little 1/2 inch cubes. Then put them on a sheet pan and toss them with some olive oil, salt and pepper. Use just enough potato to cover the bottom of the pan in a single layer. This will be the perfect amount to add to the dish late. Put the sheet pan in the oven at 400 degrees until they are completely cooked. You can continue your preparation work while they are cooking because this will take about 20 minutes but make sure to keep an eye on them so they won't burn. Most people like to fry the potatoes. I prefer the oven. It lets me control the oil I use but most of all, it lets me ignore them while I continue to cook. Frying them takes time and, as previously learned, oil on the stovetop that is ignored can ignite and cause a fire. This is a nice, safe way to get the job done.

2. Start the rice cooking in your rice cooker. If you don't have one, go buy one. They are very cheap, usually under $20. And are the easiest way to make rice without having to pay attention to it. The rice is the simplest part of this to make. Put in 2 cups of rice, 2 and 1/2 cups of water, 2 table spoons of a mild olive oil or a canola oil, 1 teaspon of granulated garlic powder and 1/2 teaspoon of salt in the rice cooker, put the lid on and press start. Easy.
 3. Chop the shallots (or onions, if you prefer them), the bell pepper, the garlic cloves, and the habanero (or the jalapenos) into small pieces. Make sure that you remove all the seeds and the ribs (the white stuff holding the seed pod) from the habanero (or jalapenos) pepper. The hot peppers should be cut very small and you may want to wear rubber gloves to handle the peppers. They could irritate your skin. Also, DO NOT touch your face and especially not your eyes with peppery hands!
4. Slice or chop the olives and set them aside in another bowl. Don't slice them too small because you want them kind of chunky. I usually slice each olice in half and then cut each half into 4 slices.
5. Set your currants to soak in the 1/2 a cup of the wine.
Let's Cook...
 1. Add some oil to the bottom of the pan set over medium heat and when it starts to shimmer saute the shallots, bell pepper, and habanero. When they are almost cooked, add the garlic. Then take them out of the pan and put them on a plate. I did this in a separate pan because I have many pans, but I am trying to show you how to do this with the least equipment possible since you may not have two pans.
2. Add the ground beef with the sazon to the pan and brown the ground beef. Then add the cooked veggies back in.
 3. Add the crushed tomatoes, the tomato paste, the currants and the red wine. Let this simmer over medium low heat for a little while. The longer it simmers, the more the flavors blend together. If it gets a little dry, you can add some more wine or water or even some beef stock. You can't be wrong here. It's just ground beef. Live a little!
 4. Add the olives and cook them for a few minutes. Then add the potatoes. I like to let the potatoes sit for about 10 minutes in the pan so that they will soak up the juices from the tomato sauce. Sometimes I add a little more wine or water or beef stock at this point to keep the mixture moist.
 5. When it had the consistency you want, just serve it. Remember you are servin it over rice so it can be a little saucy. If you have left over, put it in the refrigerator to have for lunch or to fill those empanadas. Sometimes I make this just to have empanada fillings.
This is a dish popular in almost every Cuban household and is a variation of my mother's own picadillo recipe. But it has numerous changes from my mother's original to the ingredients and the techniques.
Picadillo is basically Cuban peasant food. Every grandmother has her own recipe that she passes down to her children and no two grandmothers make it the exact same way. I like how adaptable it is to the particular tastes of each cook. It's popularity is based on how inexpensive the dish is to prepare. But it is the common simplicity of the dish that evokes that warm feeling of childhood and home.
The best part is you can make this the day before and just reheat for dinner because it is actually better the next day when the flavors truly meld. Also this is the best filling ever for the empanada. Ever. Your empanada will evocakie memories of the Jamaican patty when filled with picadillo.
The recipe below will easily feed 4 to 6 people and leave you enough to make empanadas to take for lunch the next day.
The ingredients...

2 lbs. of ground beef
4 to 5 good sized potatoes
1/2 cup of olives (Buy the pitted spanish olives that have the red pimiento inside.)
1/4 cup of currants or raisins
1 cup wine (I like red, but white is fine.)
1 green bell pepper
1 onion or 2 shallots
4 garlic cloves
3 ounces of tomato paste
1 can of crushed tomatoes
olive oil (I prefer the mild kind for this cooking.)
2 jalapeno peppers or 1 habanero (This is optional and not at all traditional. I prefer the Habanero.)
Sazon (Find this in the latin section of the grocery store but you can also use Sazon Completa,)
salt
pepper
garlic granulated powder
2 cups white rice
The equipment...
Rice cooker (these usualy have their own measuring cup)
Large pan
Cutting board
Knife
Large cooking spoon
Measuring spoons
The preparation...
 1. Peel and cut the potatoes into little 1/2 inch cubes. Then put them on a sheet pan and toss them with some olive oil, salt and pepper. Use just enough potato to cover the bottom of the pan in a single layer. This will be the perfect amount to add to the dish late. Put the sheet pan in the oven at 400 degrees until they are completely cooked. You can continue your preparation work while they are cooking because this will take about 20 minutes but make sure to keep an eye on them so they won't burn. Most people like to fry the potatoes. I prefer the oven. It lets me control the oil I use but most of all, it lets me ignore them while I continue to cook. Frying them takes time and, as previously learned, oil on the stovetop that is ignored can ignite and cause a fire. This is a nice, safe way to get the job done.
2. Start the rice cooking in your rice cooker. If you don't have one, go buy one. They are very cheap, usually under $20. And are the easiest way to make rice without having to pay attention to it. The rice is the simplest part of this to make. Put in 2 cups of rice, 2 and 1/2 cups of water, 2 table spoons of a mild olive oil or a canola oil, 1 teaspon of granulated garlic powder and 1/2 teaspoon of salt in the rice cooker, put the lid on and press start. Easy.
 3. Chop the shallots (or onions, if you prefer them), the bell pepper, the garlic cloves, and the habanero (or the jalapenos) into small pieces. Make sure that you remove all the seeds and the ribs (the white stuff holding the seed pod) from the habanero (or jalapenos) pepper. The hot peppers should be cut very small and you may want to wear rubber gloves to handle the peppers. They could irritate your skin. Also, DO NOT touch your face and especially not your eyes with peppery hands!
4. Slice or chop the olives and set them aside in another bowl. Don't slice them too small because you want them kind of chunky. I usually slice each olice in half and then cut each half into 4 slices.
5. Set your currants to soak in the 1/2 a cup of the wine.
Let's Cook...
 1. Add some oil to the bottom of the pan set over medium heat and when it starts to shimmer saute the shallots, bell pepper, and habanero. When they are almost cooked, add the garlic. Then take them out of the pan and put them on a plate. I did this in a separate pan because I have many pans, but I am trying to show you how to do this with the least equipment possible since you may not have two pans.
2. Add the ground beef with the sazon to the pan and brown the ground beef. Then add the cooked veggies back in.

 4. Add the olives and cook them for a few minutes. Then add the potatoes. I like to let the potatoes sit for about 10 minutes in the pan so that they will soak up the juices from the tomato sauce. Sometimes I add a little more wine or water or beef stock at this point to keep the mixture moist.
  5. When it had the consistency you want, just serve it. Remember you are servin it over rice so it can be a little saucy. If you have left over, put it in the refrigerator to have for lunch or to fill those empanadas. Sometimes I make this just to have empanada fillings.
 Saturday, February 11, 2012
CHOCOLATE CHIP COOKIES
 This recipe is a mix-up/mash-up of various recipes I have collected over the years. It started out as a simple toll house recipe. Then my old friend, Lori Welbon (big shout-out to her for sharing), gave me her recipe for ranger cookies. Well, not really her recipe, the recipe originally belonged to an elderly neighbor of hers in Arizona. Doesn't really matter, where they started out, these ranger cookies were the bomb. (Trust me, I'll post the recipe for them some other time and you'll have to agree!) I changed up the flour based on a recipe of Alton Brown's. He used bread flour in a cookie and though I don't use it exclusively, I did end up mixing it up. And, that how I came to this chocolate chip cookie recipe. Guys, this one works!
It has a nice crispy bottom, but the middle stays nice and soft. They are best when you have them soon after they are made. About 15 minutes after you take them out of the oven, they will be perfect. They won't crumble in your hands but the chips inside will still be gooey. Tall, cold glass of milk and you are good to go.
This is a simple recipe. As easy to make as they are to eat. Just remember what I said in The Rules about baking - don't mess with the amounts. Leavening agents are at work here and you need the exact amounts.
 One last thing, I am going to ask you to do me, you and the world a huge favor and only buy chocolate chips that are clearly labeled "fair trade." According to numerous human rights organizations, the chocolate industry is the worst in the world for child slave labor. As many as 2 million children work in unsafe conditions in the cacao fields of West Africa and as many as 200,000 of those are slaves, with some as young as 7 years of age. Children shouldn't be slaves. I'm not against teenagers working. I had to when I was a teenager. Times are tough and all family members should contribute. But little children should not be stolen from their parents and imprisoned as slaves to work these plantations. Spend the extra dollar for the fair trade chips. And that way you will know that some small child isn't imprisoned in a box at night and whipped during the day for your chocolate chip cookie. Google for more information if you want it, but remember that "no blood for cookies" should be your motto. Good as they are, they aren't worth that.
The Ingredients...

1 stick plus 3 tablespoons of butter. Most recipes use unsalted butter but I have always used salted butter with no problems.
1/2 a cup of Crisco in the can. Yes, you heard me that white stuff that comes in a can. For those that don't know where to find it, it is usually by the cooking oil in the grocery store. Trust me on this, the old recipes call for it because butter has a tendency to melt and flatten out your cookie. You are already using butter in this cookie for flavor, now you will use this for texture. I have heard some rumblings recently that Crisco isn't what it used to be, that the mouth-feel is all wrong. If you feel that way you can use something called Hi Ratio Shortening. I use this for buttercream icing. Problem is that it isn't easy to find and you will probably have to get it online like I do, so you can't just decide to make cookies and run to the store to get all the supplies. See, the problem? Stick to the Crisco.
1 1/3 cup of dark brown sugar. Check the package. Don't use the light brown sugar, get the dark brown. I like to use organic when possible and fair trade if I can. Important note. When you measure this out. pressed the sugar into your measuring cup. This is called "packing." Don't be afraid...press it down, but try not to press it down with hydraulic pressure - that's not necessary.
1 cup of white sugar. You have to use some of the white stuff because all dark brown will leave you with a very molasses tasting cookie.
2 large eggs. Try for grain-fed, free-roaming chicken,s if you can. I know it is more money, but do you really want to eat cannibal chicken eggs? There is just something not right about eating a chicken that has been eating chicken. Eeeewwwww.
3 tsp of vanilla. I know it sounds like a lot, but, trust me, you need it to stand up to the dark brown sugar. Less of this just disappears as if it was never even there.
2 cups of White Lily Flour. White Lily is a soft winter wheat flour. It is the best for tender biscuits, tender pie crusts and tender cookies. You can find it everywhere in the South, but it is harder to find in the North. In Chicago, I get my White Lily shipped to me and if I can't I substitute 1/2 cake flour with 1/2 all purpose flour. It seems to work. Not as well, mind you, but beggars can't be picky. Now as to measuring the flour, pay attention to this trick, I learned it in baking school. Many bakers like to measure their flour by weight. I know that you won't do that because you probably don't have a scale and aren't going to spend the money or try and find kitchen space for it. So just stick a spoon in the flour and stir it around to fluff it up some before you dig your measuring cup in. It works. Don't know why, and not going to question, just going to keep doing it that way.
1 cup of bread flour. I like King Arthur but what ever you can find should work.
1 teaspoon of salt.
1 teaspoon of baking soda.
1 teaspoon of baking powder.
1 1/2 bags of semi-sweet chocolate chips. This one is tricky. I like Guittard, but you have to be careful, not all their chips are fair trade. The fair trade ones are clearly marked.
The Equipment...
A hand mixer (A stand mixer is better but I know you may not have one. Back to that wedding registry thing...ahhh, the difficulties of getting married later in life. Reminds me of Carrie's Sex and the City lament. Seriously, though, a hand mixer can be bought for $15 dollars or less depending on the store so no reason you can't have one.)
Measuring cups.
Measuring spoons.
Two bowls. One big enough to hold all the flour and a large bowl to do your mixing in. If you don't have two bowls then use the large bowl to mix in and use a piece of parchment paper to measure the flour out on. This might even make it easier for you to add the flour to the mixing bowl later. If you don't have a large bowl, you should. Try Goodwill for a cheap one.
A baking sheet. Two is better but you can get away with just one.
Parchment paper. You can buy this at the grocery store where the wax paper and foil paper is. I prefer a silpat baking mat, but I know they are expensive and you probably don't have one. So I am going to make these on parchment to show you how it is done.
A large stirring spoon. I like using wooden ones, but I have a nice silicon one that works well, too. Your choice here, no judgement.
A small ice cream scoop or two spoons. It is easier to scoop the cookie dough onto the baking sheet with a small ice cream scooper. If you don't have one, you can use two spoons to scoop it out and then use one of them to push the dough off the other onto the sheet.
The Preparation...
 1. Let the butter soften. You don't have to get it to room temperature exactly. Just leave it on your countertop for 20 minutes or so. Just so it isn't hard as a rock. Don't leave it sitting out there too long because you don't want microbes setting up house in your butter.
2. Measure put the 2 cups of flour and cup of bread flour in a bowl. Add the teaspoon of baking soda, the teaspoon of baking powder and the teaspoon of salt to the same bowl. Stir this all together and then put it aside for now.
3. In your large mixing bowl and using your hand mixer, mix 1 stick plus three tablespoon of butter with the 1/2 cup of lard. This is technically called "creaming." So if you ever see this term in a cookbook, just know that it is a fancy word for mix together.
 4. Add the cup of white sugar and the 1 1/3 cups of dark brown sugar to the bowl with the butter and "cream' together with the butter.
 5. Then add the eggs and the 3 teaspoons of vanilla to the bowl and keep creaming with your hand mixer. Now a word about the eggs. Let me suggest to you that you crack and open each egg separately into a cereal bowl. In other words, crack the first egg into the cereal bowl and pour it into your big bowl, then do the same with the second egg. I suggest this so that you can avoid getting shells into your batter, but also because sometimes you get a bad egg. You can get an egg with some blood in it and if you cracked it into your butter mix then you have ruined the whole thing. Same if you crack both eggs into the cereal bowl together. The first egg may have been fine, but the second egg is bloody so now both eggs are covered in blood. If you keep them separate, you can save wasting money on ruined ingredients.
6. Now slowly add the flour that you mixed together and set aside before. Put mixer on very slow speed or flour will go everywhere!
 7. Finally, you will add the chocolate chips. Don't use the mixer for this, use your big mixing spoon! If you use the mixer, it will break some of the chips. Let's keep those chips whole and pretty. Yay!
8. Now you can choose to bake your cookies now or bake them at a later time. If you want to make them later just cover your bowl with some cling wrap and put it in your refrigerator. .
Let's Get Ready to Bake...
 1. Turn your oven on to 350 degrees.
2. While the oven is heating start prepping to bake by covering your sheet pan's bottom with parchment paper. See my picture here for what it looks like? Trust me, it's very simple.
3. Take your batter out of the refrigerator and use the ice cream scooper or two regular spoons to put the cookies on the baking sheet. I usually put 12 cookies on at a time.
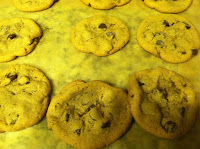 4. Pop them in the oven for about 10 to 12 minutes. It may be a little less or a little more depending on your oven but they don't come out super dark on top and they will still look kind of soft. As soon as you take them out, they will start to harden on the outside and be perfect on the inside.
5. Repeat the cooking with the rest of the batter. Easy.
 This recipe is a mix-up/mash-up of various recipes I have collected over the years. It started out as a simple toll house recipe. Then my old friend, Lori Welbon (big shout-out to her for sharing), gave me her recipe for ranger cookies. Well, not really her recipe, the recipe originally belonged to an elderly neighbor of hers in Arizona. Doesn't really matter, where they started out, these ranger cookies were the bomb. (Trust me, I'll post the recipe for them some other time and you'll have to agree!) I changed up the flour based on a recipe of Alton Brown's. He used bread flour in a cookie and though I don't use it exclusively, I did end up mixing it up. And, that how I came to this chocolate chip cookie recipe. Guys, this one works!
 It has a nice crispy bottom, but the middle stays nice and soft. They are best when you have them soon after they are made. About 15 minutes after you take them out of the oven, they will be perfect. They won't crumble in your hands but the chips inside will still be gooey. Tall, cold glass of milk and you are good to go.
This is a simple recipe. As easy to make as they are to eat. Just remember what I said in The Rules about baking - don't mess with the amounts. Leavening agents are at work here and you need the exact amounts.
 One last thing, I am going to ask you to do me, you and the world a huge favor and only buy chocolate chips that are clearly labeled "fair trade." According to numerous human rights organizations, the chocolate industry is the worst in the world for child slave labor. As many as 2 million children work in unsafe conditions in the cacao fields of West Africa and as many as 200,000 of those are slaves, with some as young as 7 years of age. Children shouldn't be slaves. I'm not against teenagers working. I had to when I was a teenager. Times are tough and all family members should contribute. But little children should not be stolen from their parents and imprisoned as slaves to work these plantations. Spend the extra dollar for the fair trade chips. And that way you will know that some small child isn't imprisoned in a box at night and whipped during the day for your chocolate chip cookie. Google for more information if you want it, but remember that "no blood for cookies" should be your motto. Good as they are, they aren't worth that.
The Ingredients...

1 stick plus 3 tablespoons of butter. Most recipes use unsalted butter but I have always used salted butter with no problems.
1/2 a cup of Crisco in the can. Yes, you heard me that white stuff that comes in a can. For those that don't know where to find it, it is usually by the cooking oil in the grocery store. Trust me on this, the old recipes call for it because butter has a tendency to melt and flatten out your cookie. You are already using butter in this cookie for flavor, now you will use this for texture. I have heard some rumblings recently that Crisco isn't what it used to be, that the mouth-feel is all wrong. If you feel that way you can use something called Hi Ratio Shortening. I use this for buttercream icing. Problem is that it isn't easy to find and you will probably have to get it online like I do, so you can't just decide to make cookies and run to the store to get all the supplies. See, the problem? Stick to the Crisco.
1 1/3 cup of dark brown sugar. Check the package. Don't use the light brown sugar, get the dark brown. I like to use organic when possible and fair trade if I can. Important note. When you measure this out. pressed the sugar into your measuring cup. This is called "packing." Don't be afraid...press it down, but try not to press it down with hydraulic pressure - that's not necessary.
1 cup of white sugar. You have to use some of the white stuff because all dark brown will leave you with a very molasses tasting cookie.
2 large eggs. Try for grain-fed, free-roaming chicken,s if you can. I know it is more money, but do you really want to eat cannibal chicken eggs? There is just something not right about eating a chicken that has been eating chicken. Eeeewwwww.
3 tsp of vanilla. I know it sounds like a lot, but, trust me, you need it to stand up to the dark brown sugar. Less of this just disappears as if it was never even there.
2 cups of White Lily Flour. White Lily is a soft winter wheat flour. It is the best for tender biscuits, tender pie crusts and tender cookies. You can find it everywhere in the South, but it is harder to find in the North. In Chicago, I get my White Lily shipped to me and if I can't I substitute 1/2 cake flour with 1/2 all purpose flour. It seems to work. Not as well, mind you, but beggars can't be picky. Now as to measuring the flour, pay attention to this trick, I learned it in baking school. Many bakers like to measure their flour by weight. I know that you won't do that because you probably don't have a scale and aren't going to spend the money or try and find kitchen space for it. So just stick a spoon in the flour and stir it around to fluff it up some before you dig your measuring cup in. It works. Don't know why, and not going to question, just going to keep doing it that way.
1 cup of bread flour. I like King Arthur but what ever you can find should work.
1 teaspoon of salt.
1 teaspoon of baking soda.
1 teaspoon of baking powder.
1 1/2 bags of semi-sweet chocolate chips. This one is tricky. I like Guittard, but you have to be careful, not all their chips are fair trade. The fair trade ones are clearly marked.
The Equipment...
A hand mixer (A stand mixer is better but I know you may not have one. Back to that wedding registry thing...ahhh, the difficulties of getting married later in life. Reminds me of Carrie's Sex and the City lament. Seriously, though, a hand mixer can be bought for $15 dollars or less depending on the store so no reason you can't have one.)
Measuring cups.
Measuring spoons.
Two bowls. One big enough to hold all the flour and a large bowl to do your mixing in. If you don't have two bowls then use the large bowl to mix in and use a piece of parchment paper to measure the flour out on. This might even make it easier for you to add the flour to the mixing bowl later. If you don't have a large bowl, you should. Try Goodwill for a cheap one.
A baking sheet. Two is better but you can get away with just one.
Parchment paper. You can buy this at the grocery store where the wax paper and foil paper is. I prefer a silpat baking mat, but I know they are expensive and you probably don't have one. So I am going to make these on parchment to show you how it is done.
A large stirring spoon. I like using wooden ones, but I have a nice silicon one that works well, too. Your choice here, no judgement.
A small ice cream scoop or two spoons. It is easier to scoop the cookie dough onto the baking sheet with a small ice cream scooper. If you don't have one, you can use two spoons to scoop it out and then use one of them to push the dough off the other onto the sheet.
The Preparation...
 1. Let the butter soften. You don't have to get it to room temperature exactly. Just leave it on your countertop for 20 minutes or so. Just so it isn't hard as a rock. Don't leave it sitting out there too long because you don't want microbes setting up house in your butter.
2. Measure put the 2 cups of flour and cup of bread flour in a bowl. Add the teaspoon of baking soda, the teaspoon of baking powder and the teaspoon of salt to the same bowl. Stir this all together and then put it aside for now.
3. In your large mixing bowl and using your hand mixer, mix 1 stick plus three tablespoon of butter with the 1/2 cup of lard. This is technically called "creaming." So if you ever see this term in a cookbook, just know that it is a fancy word for mix together.
 4. Add the cup of white sugar and the 1 1/3 cups of dark brown sugar to the bowl with the butter and "cream' together with the butter.
  5. Then add the eggs and the 3 teaspoons of vanilla to the bowl and keep creaming with your hand mixer. Now a word about the eggs. Let me suggest to you that you crack and open each egg separately into a cereal bowl. In other words, crack the first egg into the cereal bowl and pour it into your big bowl, then do the same with the second egg. I suggest this so that you can avoid getting shells into your batter, but also because sometimes you get a bad egg. You can get an egg with some blood in it and if you cracked it into your butter mix then you have ruined the whole thing. Same if you crack both eggs into the cereal bowl together. The first egg may have been fine, but the second egg is bloody so now both eggs are covered in blood. If you keep them separate, you can save wasting money on ruined ingredients.
6. Now slowly add the flour that you mixed together and set aside before. Put mixer on very slow speed or flour will go everywhere!
 7. Finally, you will add the chocolate chips. Don't use the mixer for this, use your big mixing spoon! If you use the mixer, it will break some of the chips. Let's keep those chips whole and pretty. Yay!
8. Now you can choose to bake your cookies now or bake them at a later time. If you want to make them later just cover your bowl with some cling wrap and put it in your refrigerator. .
Let's Get Ready to Bake...
 1. Turn your oven on to 350 degrees.
2. While the oven is heating start prepping to bake by covering your sheet pan's bottom with parchment paper. See my picture here for what it looks like? Trust me, it's very simple.
3. Take your batter out of the refrigerator and use the ice cream scooper or two regular spoons to put the cookies on the baking sheet. I usually put 12 cookies on at a time.
 4. Pop them in the oven for about 10 to 12 minutes. It may be a little less or a little more depending on your oven but they don't come out super dark on top and they will still look kind of soft. As soon as you take them out, they will start to harden on the outside and be perfect on the inside.
 5. Repeat the cooking with the rest of the batter. Easy.
Friday, February 10, 2012
You can easily feed 4 big eaters eating nothing but this for dinner - I'm talking full grown manly men - or 6 to 8 normal people eating other stuff with the main course.
I have made this recipe several times over the years in both the vegetarian and non-vegetarian forms.I have never tried the vegan substitutes, but they should work fine, too. My personal favorite is the non-vegetarian version for its depth of flavor. But make which ever you are in the mood for...no right or wrong here.
This recipe is not originally mine, it started out as one by Giada De Laurentiis, who is one of my favorite chefs for her easy style. I have eliminated some things, and changed or added others, but the big shout-out goes to her for the foundations of this dish.
You can serve the sauce over any kind of pasta, or rice (brown is great) or farro or what ever you want. The sauce is good on stuff so put it on stuff. Fear not the sauce!
And, this is great for having the next day. You can just store the sauce in some container in the refridgerator and the following day all you have to do is boil some pasta or some rice, heat the sauce and serve. The flavors just meld together better when stored for a couple of days, so make it ahead if you have a date. Just please don't try to keep it for a week or treat it as a science experiment...use it in a reasonable amount of time.
 |
Gather your ingredients.
1. 2 ounces of tomato paste
2. 1 package of rigatoni pasta
3. 4 carrots or so to equal 1 1/2 cups of shredded carrots
4. 1 bell pepper
5. 1 small sweet onion or a couple of shallots
6. 4 springs of thyme
7. 4 Springs of oregano
8. 4 garlic cloves
9. 1 pound or so of crimini or baby bella mushrooms
10. 1 ounce of dried porcini mushrooms
11. 1 cup of red wine
12. Parmesan cheese
13. 1 1/2 cups or thereabouts of beef stock or broth
14. 2 ounces or so of mascarpone cheese
15. 2 tablespoons of olive oil
16. salt
17. pepper

Put the porcini mushrooms in about a cup of hot water to re-hydrate them.
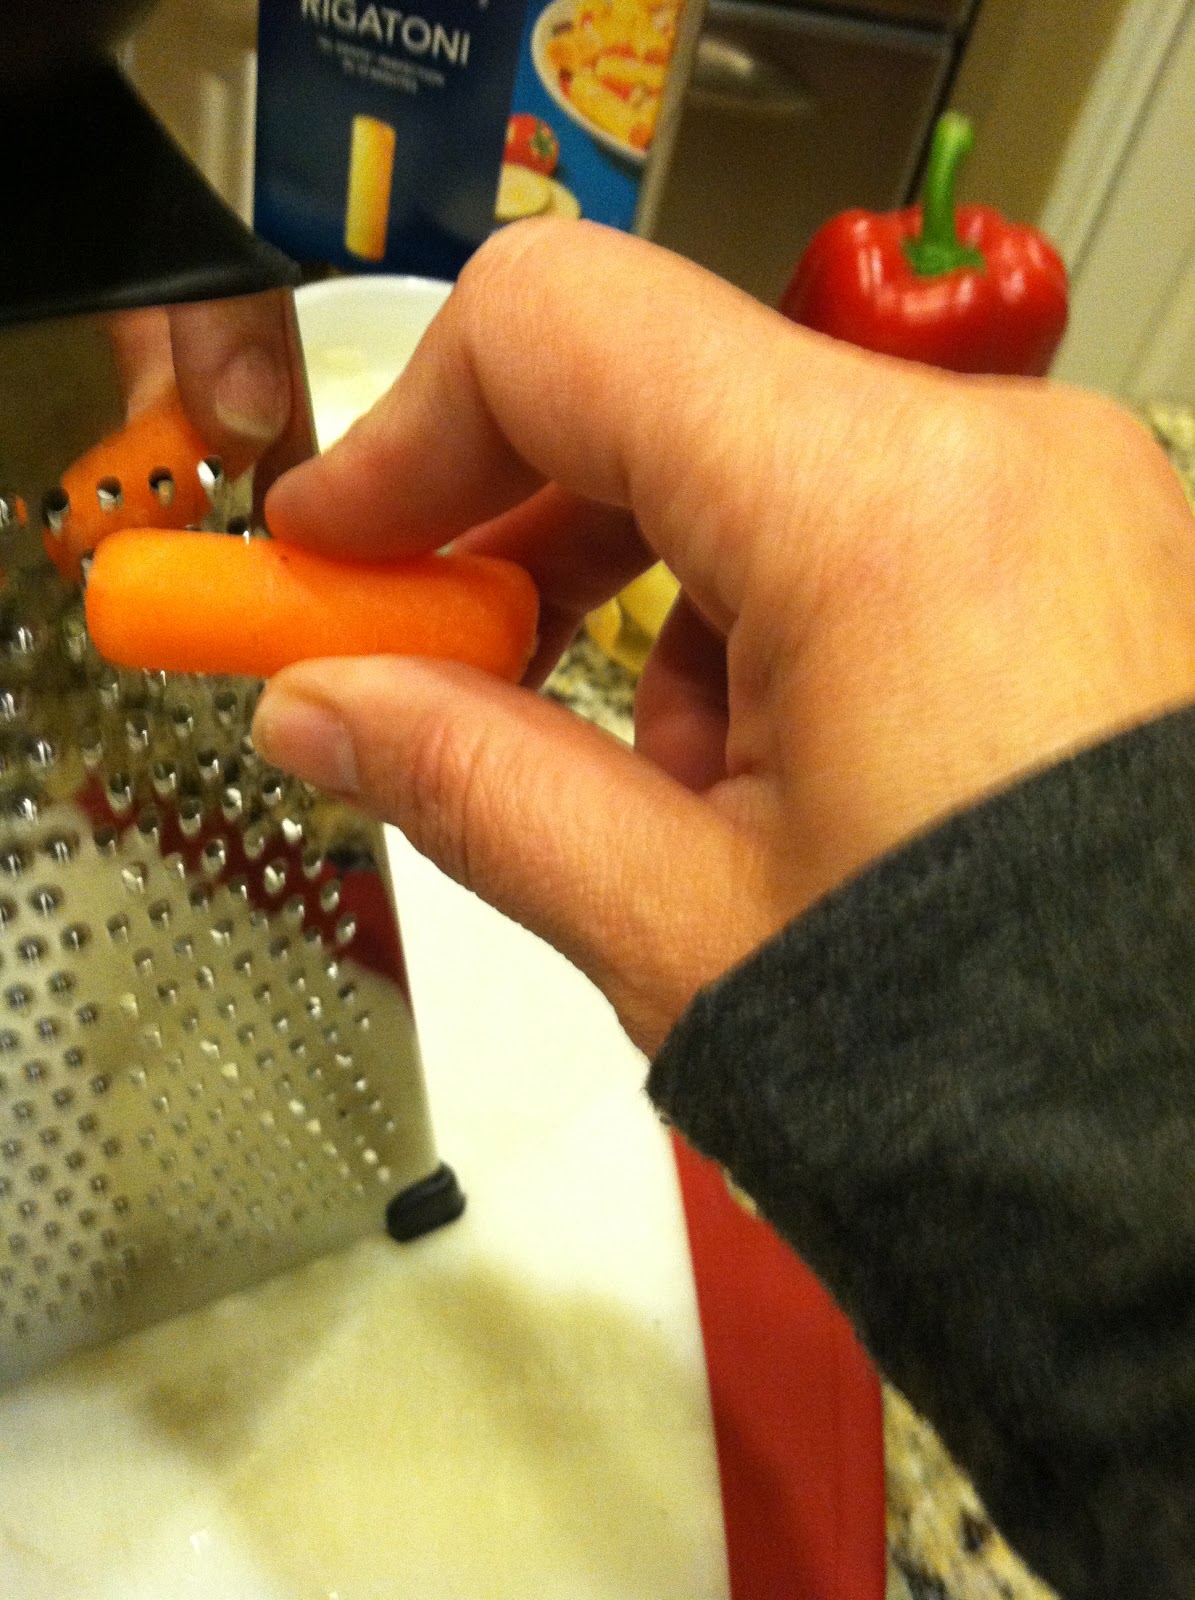

Shred the carrots.
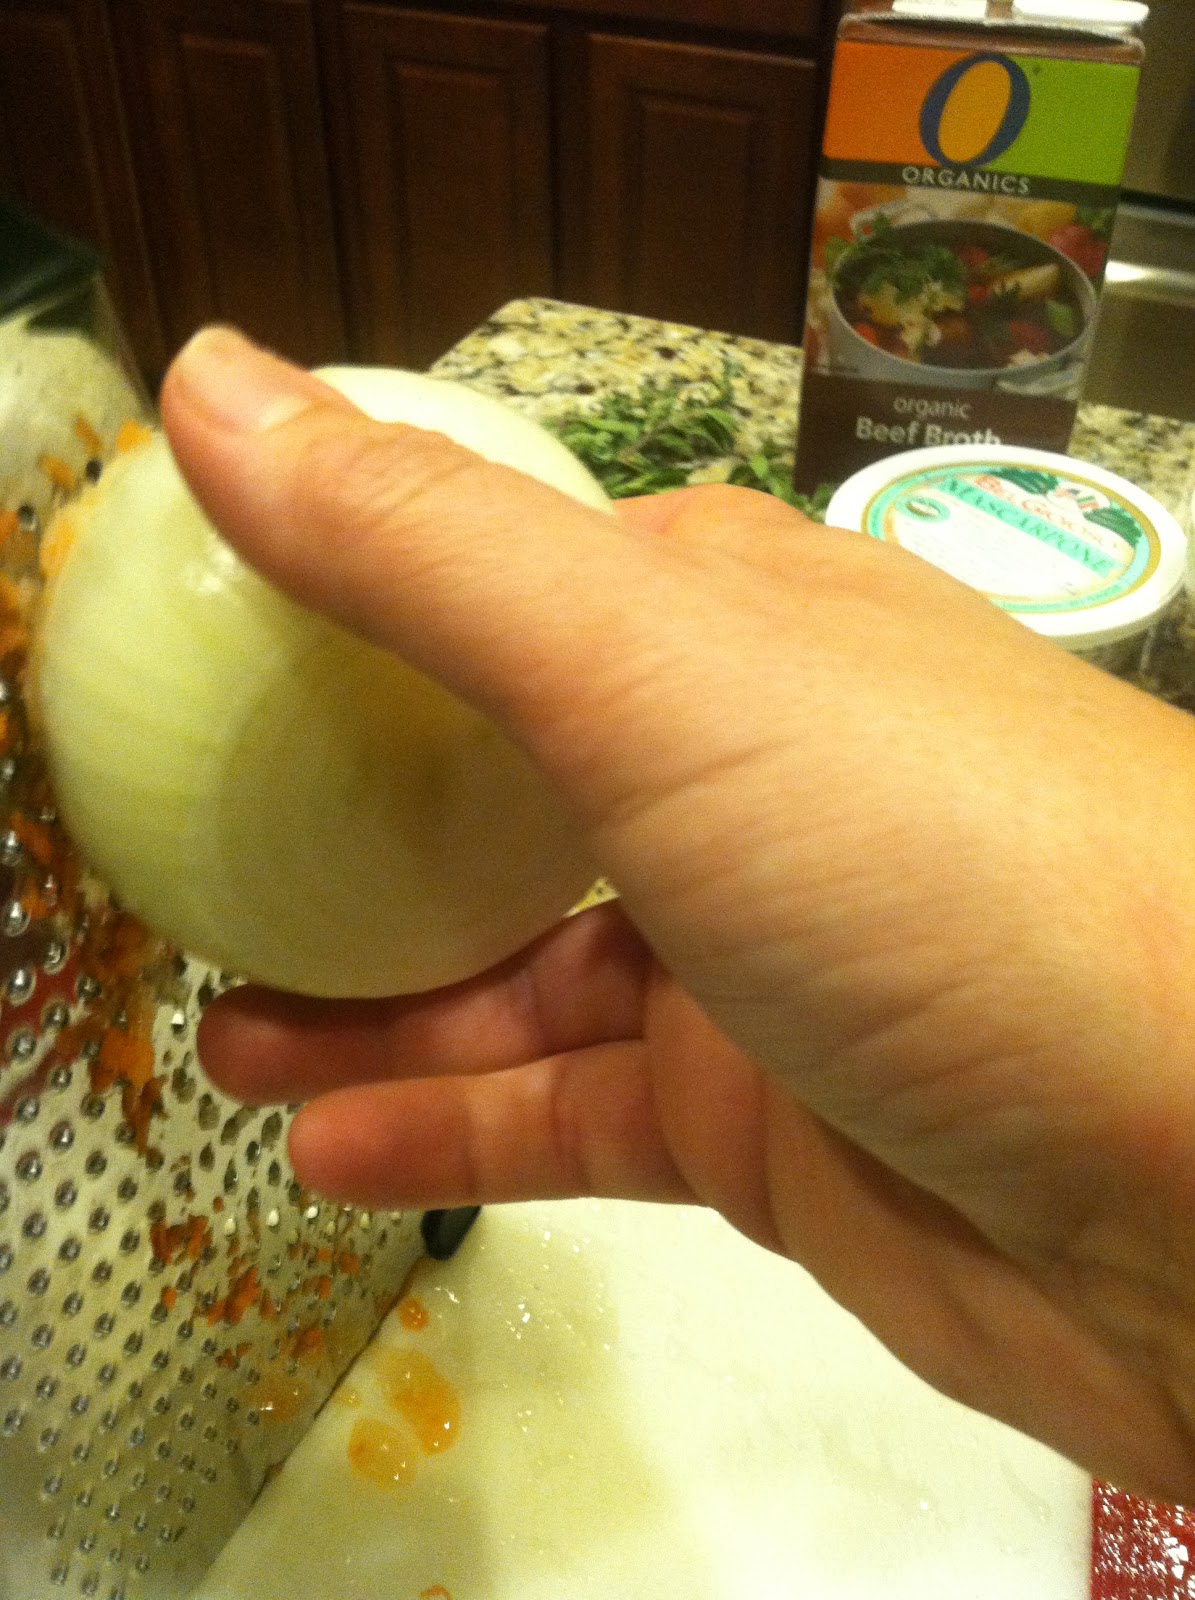
Shred the onion and the garlic cloves.

Cut the top and bottom off the bell pepper and cut out the inside

Slice the bell peppers into strips, then cut the strips into little pieces.


Chop the crimimi mushrooms. Chop the thyme and the oregano. Chop the porcini.

In a pan over medium heat, add olive oilaute the carrots until soft. Then add the onions and bell pepper until they are soft. Then add your garlic.
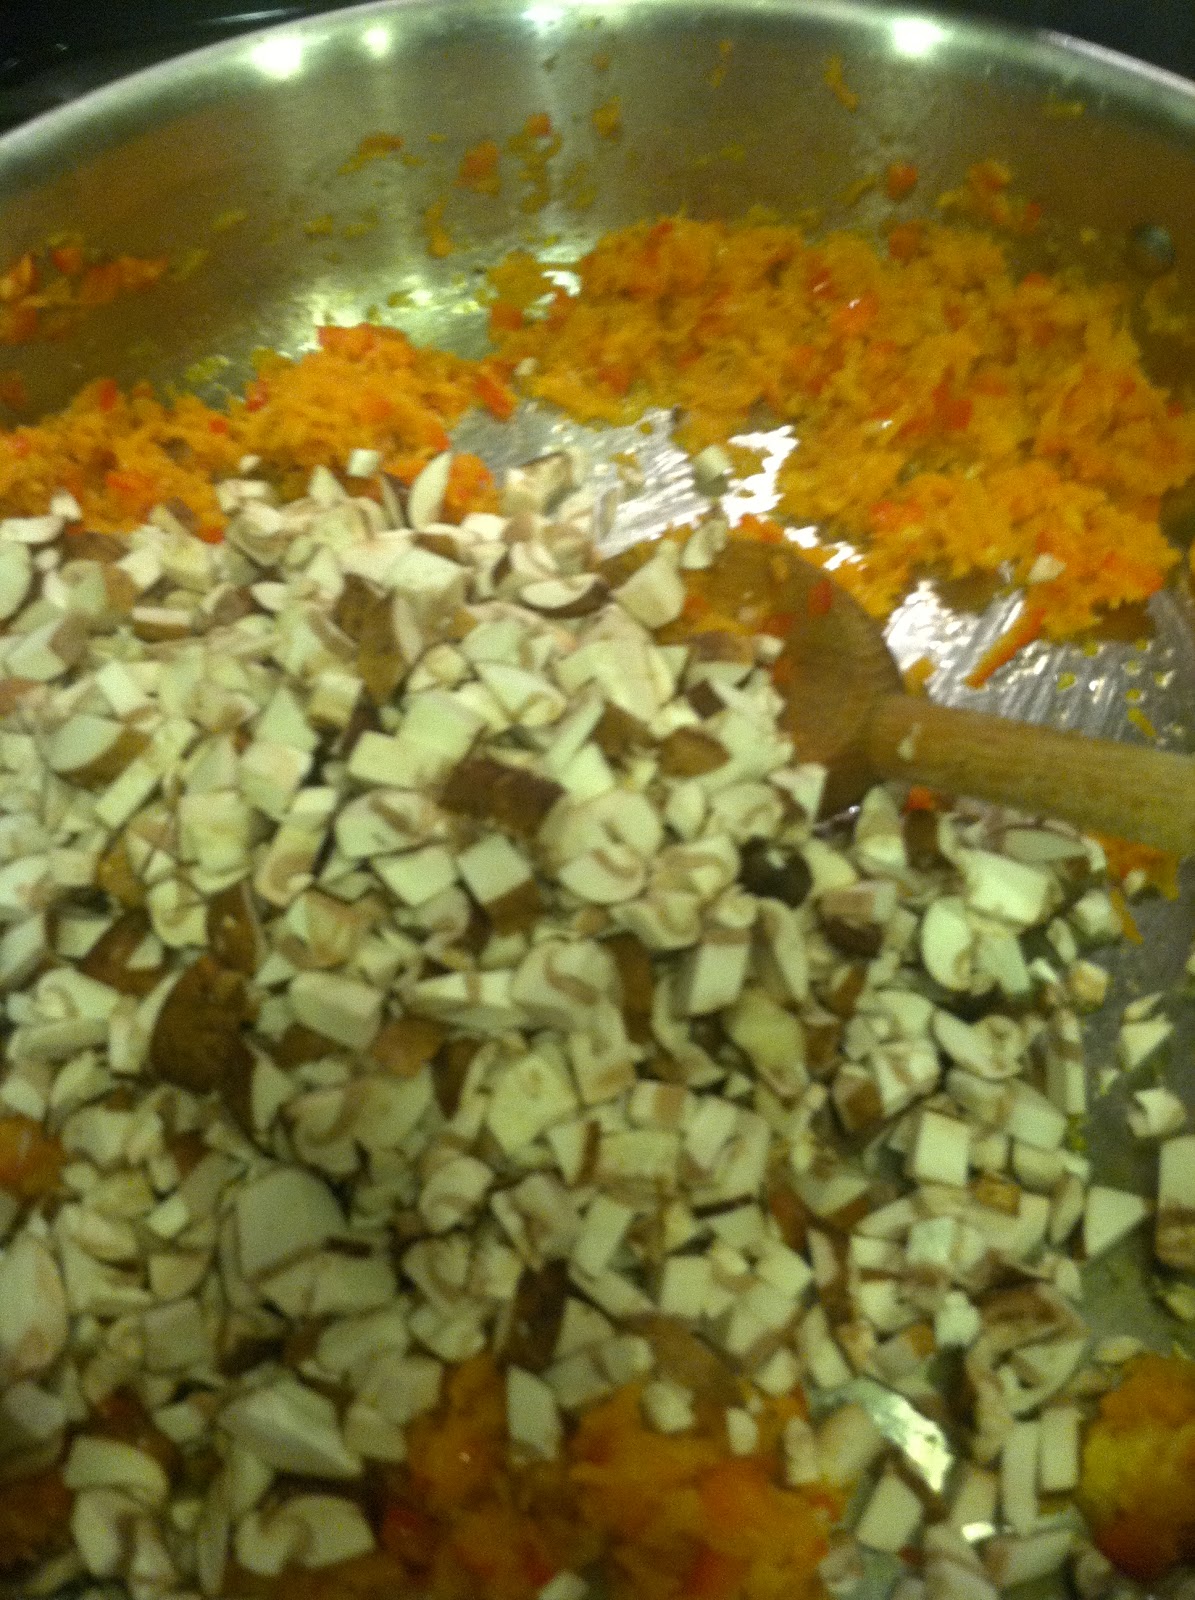
Add the crimini mushrooms. Cook them until they are soft. Then add the thyme and oregano.

Add the tomato paste and stir to dissolve.

Add the porchine mushrooms and the beef stock/broth and the wine. And allow to cook down.

Then add the mascarpone cheese. Stir to mix in the mascarpone and add in some parmesan.
SOME BASIC BITS OF KITCHEN WISDOM....
Remember these things and you and your kitchen will have a long, happy life together.
So there are a few ground rules for you to remember about cooking and I think we should review them together before we start.
Most important is that no recipe is perfect for every person exactly the way it is. Anyone who tries to convince you of this is just being arrogant and a little self-centered. So don't be afraid to change it up. If you don't like an ingredient, just remove it or substitute for something you do like. There is no reason why you shouldn't. Cooking isn't and exact science, it is an exercise in creativity. So, play with your food, it's good for you.
The above rule, however, does not equally apply when baking. Baking is a scientific experiment that requires precise amounts of certain ingredients to get things to rise properly. You can still play with flavors and such, and even play with all the ingredients, but it takes knowledge of what each ingredient does and brings to the particular party going on in your baking pan. So be more careful here or your cookies and cakes may end up stinking.
Second rule is to prepare before you start. The French call this their 'mise en place'. This means that you need to get your ingredients prepared before you start adding things to the pan. Let's say it again, guys, before you start adding things to the pan! Why, you ask? Well, simple: (1) once the cooking process starts you can't stop it because you forgot to chop something you need to add. you may end up overcooking things because you had to stop to get something else; (2) you want to make sure you actually have everything you need so you don't waste money on a half finished dish; (3) it is easy to burn stuff in the pan if you aren't watching the pan because your attention is now elsewhere in the kitchen; and (4) if you are rushing around because you are worried the stuff in your pan will burn, then you may cur yourself. Yes, once you get in some real time and practice, you can do the Rachel Ray thing and chop and prep while you have other stuff cooking in the pan, but until you reach that point try to prep before you start.
The third rule is keep a clean kitchen when cooking. Yes, I know your dishes will pile up in sinks and roommates leaves stuff around. No judgments. My place can get messy on busy days and as I've always said, life is too short to worry about laundry when there are loved ones to enjoy...sun and fun and all that calls. But the exception to this is when you are cooking. You need to keep your counters disinfected and you need to make sure that your don't cross-contaminate your food.
This means that you do not use the same knife that you just cut up chicken with to cut up your salad vegetables and you do not use the same cutting board. Understand, guys, because I can't stress this enough. You don't want to go running to the emergency room with food poisoning and you don't want to put anyone else there either.
What's that you say? But, I only have one knife and cutting board! Ahhh, grasshopper, let me introduce you to the shiny metal thing that you pile dishes in. It's called a sink. Use it and wash that knife and cutting board in between cutting different types of ingredients.
Fourth rule (and one I thought would have been obvious), you do not, do not, do not throw a pan of flaming oil in the pool to put out the flames. You shouldn't run around with a pan that's on fire. The oil could spill onto you and you will burn badly. And, you won't accomplish much because oil will just sit on the surface of the water and continue to burn.
So, how do you put out a kitchen fire you ask? Why, with your handy-dandy fire extinguisher. What's that, you don't have one? Well, go get one! They aren't that expensive. Get one that is rated for grease fires and keep it in the kitchen. Use it when your pan is fire crazed. A small fire can be extinguished by just putting a lid on the pan, but if it is huge, and you have a huge pan of oil, use the fire extinguisher. Don't grab the pan and try to run for the pool. That is just bad, bad, bad!
Remember these things and you and your kitchen will have a long, happy life together.
Thursday, February 9, 2012
AND SO IT BEGINS
I decided to start writing this blog today after talking to my youngest son about what he was going to cook for his girlfriend for dinner. In typical fashion for him and his brothers, he called me from the grocery store, as he strolled the aisles, asking for the ingredients and the recipe for Vegetable Bolognese.
This is not a simple request. Texting all the ingredients to him and then walking him through the recipe takes time. Time that I don't always have at the moment that one of the boys is strolling the grocery aisles.
Even worse, after the process, as he checks out the ingredients, he realizes that they are going to cost more money than he has on him. Being a lowly student with a job at his university, money is necessarily the underlying factors in these decisions. And he is not alone, his brothers are at different universities, but they have the same considerations. So now we have to start all over again.
Well, for some time now, I have been coming to the realization that I managed to screw a few things up as a parent. Oh, I got them through many things, taught them the value of human life and the worth integrity. I taught them to think for themselves and use logic and reason in their decision making. Yep, they are great boys. Considerate, egalitarian, intellectual, kind...in short, everything you could want a son to be.
But, I left a few important things out. Like, how important it is to perform regular maintenance on your car and not drive 60,000K without changing the oil. Yep, that's a problem. Or how, you should not continue to drive your car for 3 months with the 'check engine' light lit. Yep, that's a problem.
And, even though I managed to teach them how much girls like it when you take the time to cook dinner for them, I forgot to teach them how to do it. Like the car thing, I just assumed, since they spent so much time in the kitchen with me while I worked, that some sort of osmosis thing would happen and they would know what to do. Apparently not. Epic fail there.
In light of this, I am publishing this blog as a cooking manual of sorts for my boys. If you have real kitchen skills, you are probably going to find me rather tedious as I explain things in detail. But if, like my sons, you are just learning your way around the kitchen then you may enjoy reading this blog.
My methodology will be simple. I will go through all of the recipes that they are always asking for, thus letting them be my guides in this process. I will lay out the ingredients and prepare the recipes, providing step-by-step images along the way. And, I will tell them where they can buy ingredients and how much they should expect to pay. Finally, I will try to use the simplest tools in the kitchen since I know that they don't have the fancy equipment that I do.
I expect that the pictures will likely suck at first. And so may the writing. I am a novice at this, after all. But, as with all things, I will improve as time goes on.
Finally, it is my fervent hope that this will forever remain a loving, motherly reference for them throughout their lives.
Enjoy,
Keyla
 |
| Me and My Boys |
This is not a simple request. Texting all the ingredients to him and then walking him through the recipe takes time. Time that I don't always have at the moment that one of the boys is strolling the grocery aisles.
Even worse, after the process, as he checks out the ingredients, he realizes that they are going to cost more money than he has on him. Being a lowly student with a job at his university, money is necessarily the underlying factors in these decisions. And he is not alone, his brothers are at different universities, but they have the same considerations. So now we have to start all over again.
Well, for some time now, I have been coming to the realization that I managed to screw a few things up as a parent. Oh, I got them through many things, taught them the value of human life and the worth integrity. I taught them to think for themselves and use logic and reason in their decision making. Yep, they are great boys. Considerate, egalitarian, intellectual, kind...in short, everything you could want a son to be.
But, I left a few important things out. Like, how important it is to perform regular maintenance on your car and not drive 60,000K without changing the oil. Yep, that's a problem. Or how, you should not continue to drive your car for 3 months with the 'check engine' light lit. Yep, that's a problem.
And, even though I managed to teach them how much girls like it when you take the time to cook dinner for them, I forgot to teach them how to do it. Like the car thing, I just assumed, since they spent so much time in the kitchen with me while I worked, that some sort of osmosis thing would happen and they would know what to do. Apparently not. Epic fail there.
In light of this, I am publishing this blog as a cooking manual of sorts for my boys. If you have real kitchen skills, you are probably going to find me rather tedious as I explain things in detail. But if, like my sons, you are just learning your way around the kitchen then you may enjoy reading this blog.
My methodology will be simple. I will go through all of the recipes that they are always asking for, thus letting them be my guides in this process. I will lay out the ingredients and prepare the recipes, providing step-by-step images along the way. And, I will tell them where they can buy ingredients and how much they should expect to pay. Finally, I will try to use the simplest tools in the kitchen since I know that they don't have the fancy equipment that I do.
I expect that the pictures will likely suck at first. And so may the writing. I am a novice at this, after all. But, as with all things, I will improve as time goes on.
Finally, it is my fervent hope that this will forever remain a loving, motherly reference for them throughout their lives.
Enjoy,
Keyla
Subscribe to:
Comments (Atom)